How To Make Your Own Camera Sound Blimp For Under $150
- Jan 21, 2014
- 3 min read
Shhhhhhhhhhh… Be vewy, vewy quiet!
A sound blimp is the perfect thing for shooting in virtual silence on movie and TV sets, PGA games, anyplace where you need silence. You can rent or buy the professional ones, like Jacobsen, for just over a thousand dollars. They’re purpose-built and fantastic. But I’ve built my own for a few of my digital bodies, and they’re a lot less expensive. When I first shot on movie sets, I’d rent a blimp. They cost well over $1000 for the blimp and a few lens tubes. They’d also cost that much to rent for a production if I shot the whole thing. I was billing it either way, and I rarely needed them, so renting made the most sense. One size doesn’t fit all, each camera body style has to have a different blimp set up for it. Putting a Nikon F3 inside a blimp made for an F4 wouldn’t work.
I worked on a low-budget sci-fi film a few years ago, and the project didn’t have enough to pay me what I wanted AND afford the rental equipment. A friend was one of the producers, and wanting the money more than just to help him out, I offered that if he’d pay for the supplies, I’d build my own blimp. He agreed, and I built one over the next two days. It turned out fantastic, the sound man asked if I’d built it myself. I held it up to show him and said “obviously!” with a smile. He held a mic directly over it, I fired a few frames, and he nodded his head in approval.
It worked really well on that production, and I’ve used it since. I posted something on a forum about it a couple of years ago, and I still get 1-2 emails a week asking for the plans. I decided to build a newer one, using what I’d learned from and since building the last one.
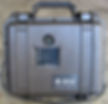
You start off with a Pelican 1200 case. That fits most cameras. You then mark off the foam inside, facing the back of the camera toward the lid of the case. Makes card changes, etc. much easier. I used toothpicks to mark around the foam, then plucked it to size. I then scanned both sides of my camera on my scanner to have a template to put on the front and back to line up the holes for lens, viewfinder and rear LCD.

I cut the holes with a combination of a drill and a Dremel tool with various cutting and grinding wheels. I measured the cut-out area around the viewfinder and LCD and had a piece of glass cut to size at a local glass shop. I used 3/16″ glass. Thick enough but not too thick. And I made it just larger than the area, the larger the glass is the more weight it adds, and this rig can get heavy. I used silicone to seal the glass to the inside, making sure there were no air holes. Air movement is your enemy here, as it is a great transmitter of sound. Ever been in a bedroom with poor or no weatherstripping on the door? You can hear everything outside the room with amazing clarity, because the air lets the sound pass right through. Silicone also covers the hole for the electronic release cable as well as holding it in place.

Note that I also put in some Dynamat to help deaden the case even more. It adds weight, and I could have covered the entire inside of the case with it, but the foam and the case itself do a pretty good job. The front part is a hole cut in the case, surrounding the lens. There’s a 4″ closet flange, found in your hardware store where all the PVC pipe stuff is. That’s the receiver for all of the lens tubes. I then used a 3″ connector with a UV filter glued and siliconed in place to be the final lens hood and sound dampener. It’s not airtight enough to be waterproof, but it does a good job in stopping sound. This case will be a good splash guard for a camera in a pinch, but you might want to put a plastic bag around the electronic cable release.
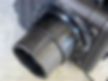
Here’s the front, with the closet flange and lens tube. I shaved the raised part of the case down flush underneath the flange and used screws to hold it on, with silicone to seal it. Not the prettiest thing but it works!

Here’s the mounting of the cable release. I use velcro, so if I have to take it off I can, otherwise it’s easy to grasp and fire when I’m holding the sides of the blimp.
I set the camera on manual, usually, because the lighting is usually tungsten indoors and set for a specific thing. Every time they change the lights, I’ll change the exposure, but there’s usually plenty of time for that. Also I set the AF for single frame and to use the center AF sensor when I half- press the release, so I can prefocus, hold and recompose, then fire when ready.
You can hear the difference between having the blimp and not having it in the sound file below. If you build one of these, let me know how you like it!